Screen Sharing
Return to Collaboration and Communication
- 1. Overview
- 2. Requirements
- 3. Downloading, Installing and initiating Screen Sharing
- 4. Joining a session as a Viewer
Overview
Screen Sharing in ServicePRO has a wide range of features for remote viewing sessions.
- Ability to switch participant of remoteASSIST for the presenter of the session.
- Ability to share keyboard and mouse controls.
- Ability to access one or more remote desktops
- Ability to initiate a file transfer from remoteASSIST.
- Ability to initiate a chat via remoteASSIST.
- Ability to remotely lock or unlock screen via CTRL+ALT+DELETE command.
- Ability to remotely launch a reboot of a machine and reconnect once rebooted.
- Screen Sharing is currently not supported for Mac OSes.*
Requirements
The following is required for screen sharing:- TCP port 5900 (or another port specified during installation) on the server hosting the Screen Sharing service must be open.
- The User joining a Screen Sharing session must be able to access the End-User Web Portal.
Downloading, Installing and initiating Screen Sharing
Installing and Initiating Screen Sharing
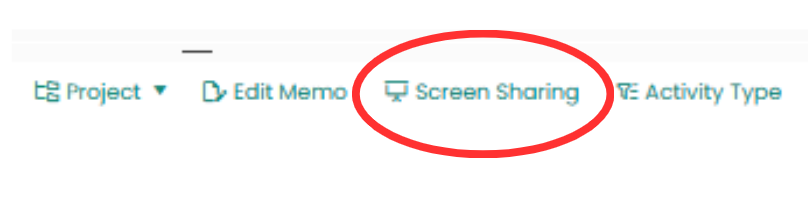
To access Screen Sharing, you must be viewing a Service Request.
- Select Screen Sharing from the Ribbon toolbar of a service request:
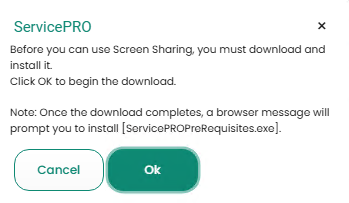
- Selecting OK will initiate a download for ScreenSharingClient.exe. This will allow you to install ServicePROPreRequisites.exe.
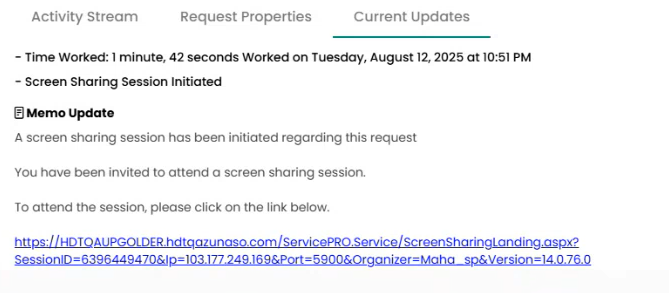
- The following email template will appear, containing the link for the viewer to click to attend the screen sharing session. Once sent, the viewer will recieve the link in their mail email inbox.
An Email will be sent out to the selected viewer stated in the To field. In addition, a Downloads window will appear on the top-right of the screen, to open and download the ServicePROPreRequisites.exe. file.
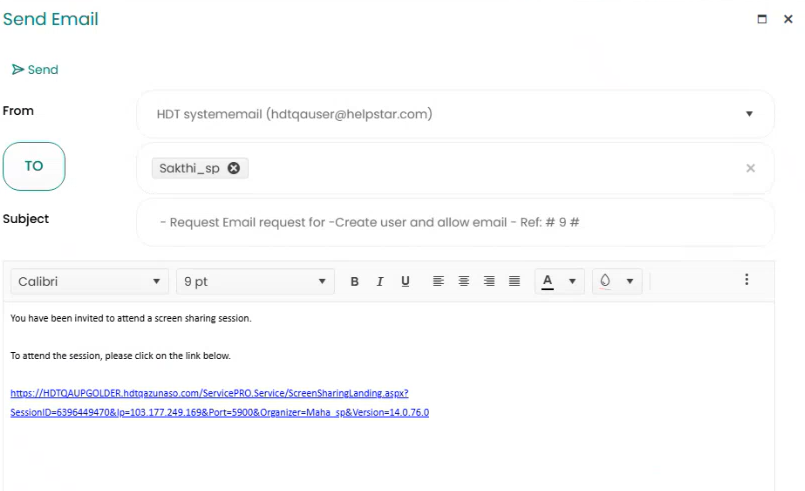 Send Email
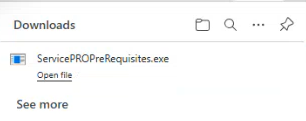
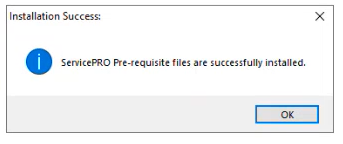
- Once the file is downloaded, a command prompt window will open, and Screen Sharing will automatically be installed to the directory listed above. A message saying “ServicePRO Pre-requisite files are successfully installed” will confirm installation. Press OK to close the windows.
- Once the email is sent to the viewer, the following pop-up appears to Launch Screen Sharing. Click on the Launch Screen Sharing hyperlink in the pop-up.

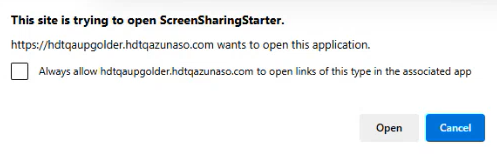
- Once the link is clicked, the following window appears. Click Open to start the Screen Sharing Session.
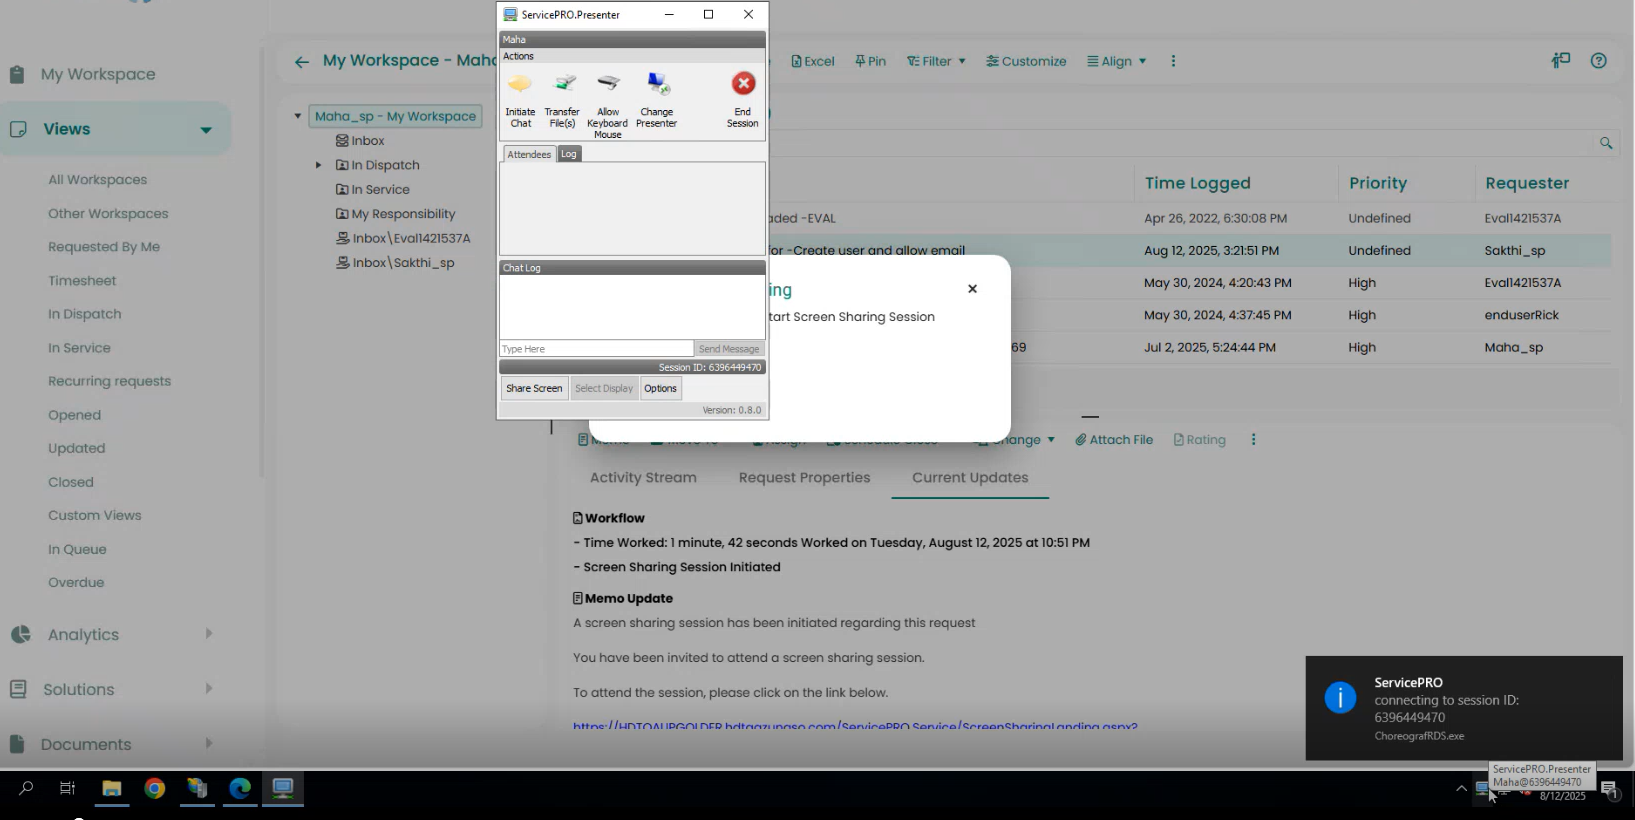
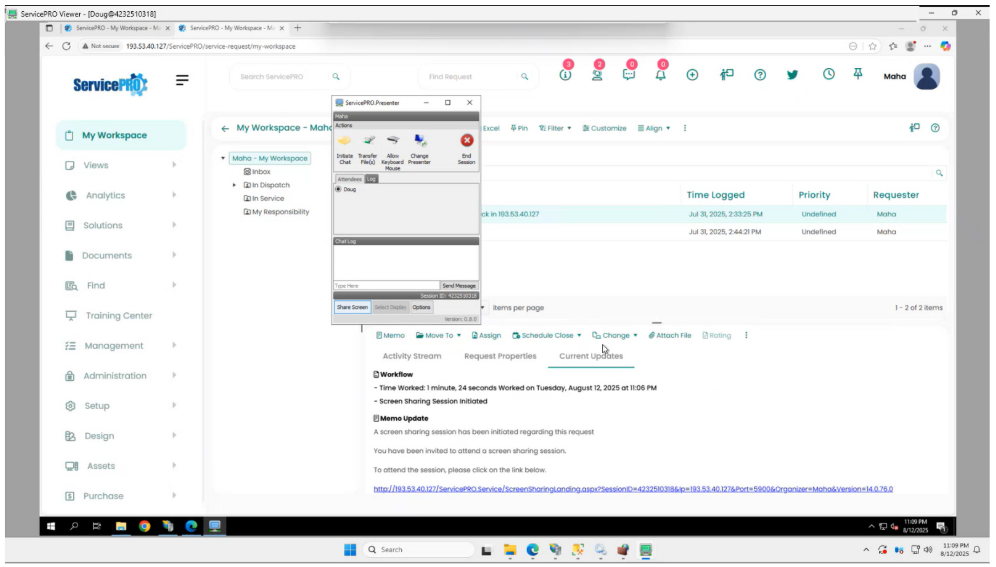
- Once you click open, the presenter interface will appear, as shown below.
Joining a session as a Viewer
Viewers will be provided a link via e-mail, or it may show up in their ServicePRO Inbox provided the presenter has provided an e-mail link.

Upon clicking the link, viewers will be shown the following screen:
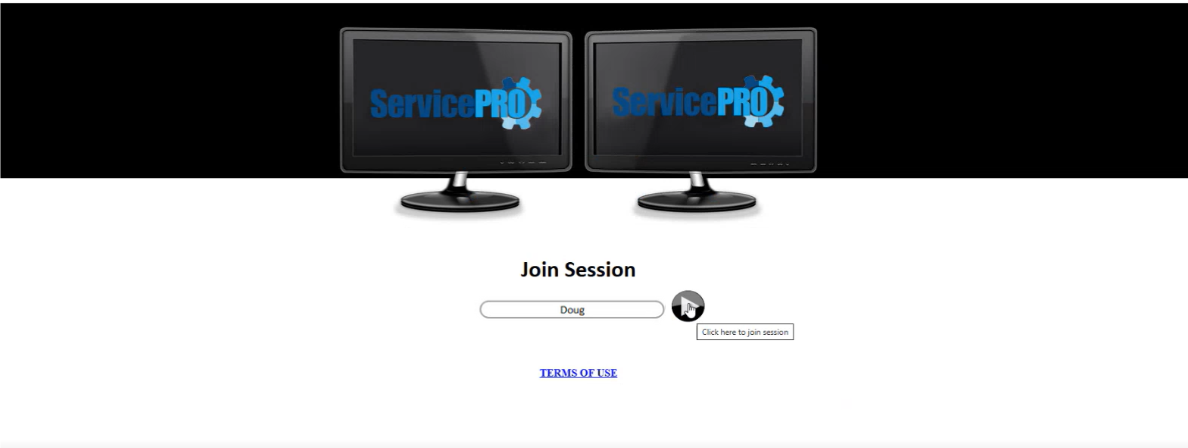
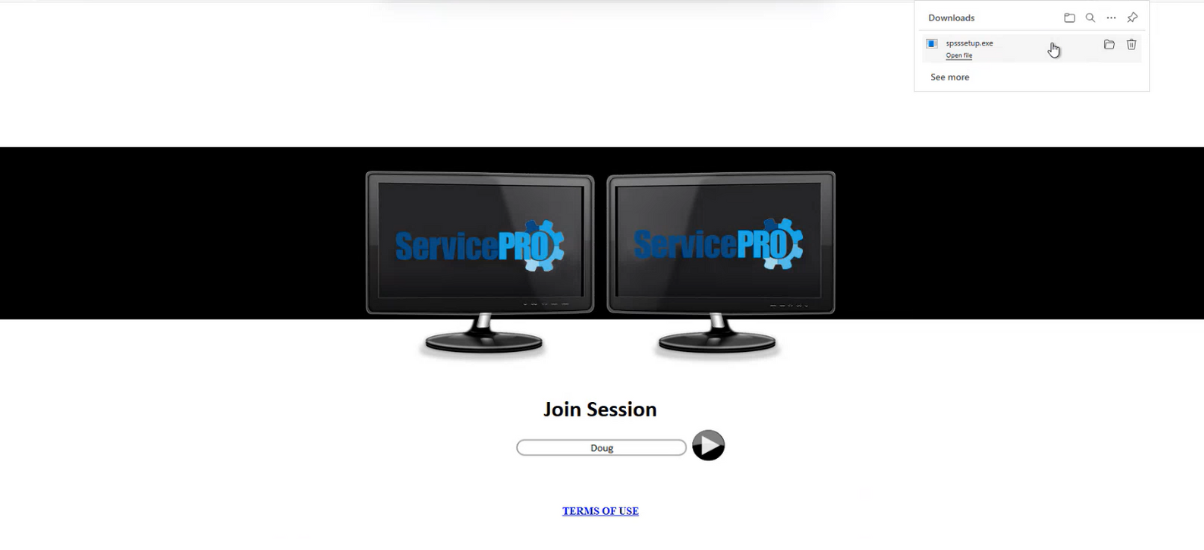
Viewers can then insert their name in the text box, and click on the "Click here to join session" button as shown in the image above.
Once clicked, the viewer will then see a downloads window on the top right of the screen, prompting them to download the spsssetup.exe file.
Using the ServicePRO Viewer
The viewer views the contents of the screen. It can be resized manually by dragging the window borders or adjusted in the Options/Settings menu.
Presenter Interface
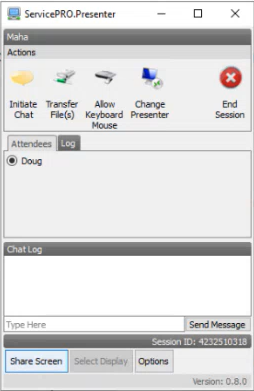
Presenter View Ribbon
The Presenter ribbon contains 5 options:
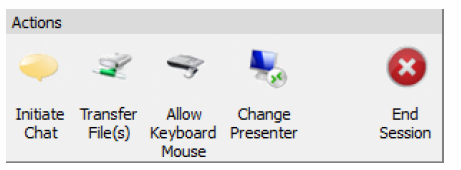
- Initiate Chat – Presenters and viewers can speak via an instant messaging interface.
- Transfer File(s) – This allows the user to send files to anyone selected in the attendee list.
- Allow Keyboard Mouse – Give keyboard and mouse control of another terminal to the presenter.
- Change Presenter – The organizer will start the session as the presenter but may select any user in the list and set them as the new presenter.
- End Session – Only the organizer may end the session. Others may leave the meeting but only the organizer may end the session. If the organizer leaves the session without ending the session, the session will end
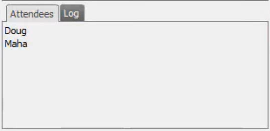
Attendee List
The attendees tab shows all of the viewers in the session as seen below:
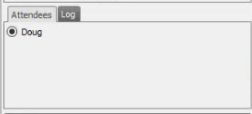
Each name has a radio button beside it to allow the user to be selected for ribbon options. The log tab shows the time of each action taken during the session including:
- Connections
- Disconnections
- Presenter changes
- Organizer changes
- File transfers
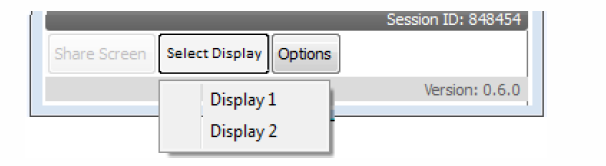
Presenter Options and Controls
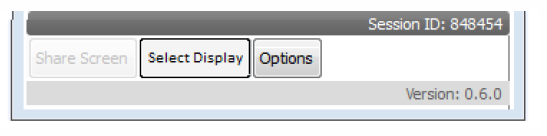
This section contains:
- The Session ID - This ID may be given to others to join the session as a viewer
- Share Screen - This is grayed out for non-presenter attendees.
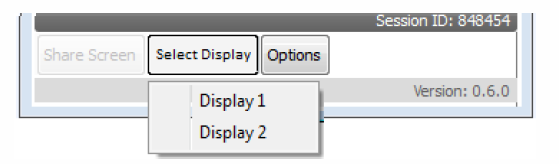
- Select Display - This allows you to show your screen to decide which of the displays you wish to view. This option should only be available if there are two or more screens.
- Options – This will bring up the options window.
 Display Options
Viewer Ribbon
The viewer ribbon contains only three options, leaving out Allow Keyboard Mouse and Change Presenter from the Presenter version:
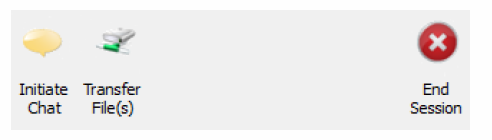
- Initiate Chat - Presenters and viewers can speak via an instant messaging interface.
- Transfer File(s) - This allows the user to send files to anyone selected in the attendee list.
- End Session - Only the organizer may end the session. Others may leave the meeting but only the organizer may end the session. If the organizer leaves the session without ending the session, the session will end.
Attendee List
The attendees tab shows all of the users in the session with both the organizer and presenter as seen below:
Each name has a radio button beside it to allow the user to be selected for ribbon options. The log tab shows the time of each action taken during the session including:
- Connections
- Disconnections
- Presenter changes
- Organizer changes
- File transfers
Viewer Options and Controls
This section contains:
- The Session ID – this ID may be given to others to join the session as a viewer
- Share Screen – This is grayed out for non-presenter attendees.
- Select Display –This allows you to show your screen to decide which of the presented displays you wish to view. This option should only be available if there are two or more screens being presented.
Chat
This area allows you to chat with other attendees.
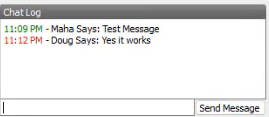
Each chat message will indicate the time it was sent (with text colored), the person who sent the message (with text bolded), and the chat text.
File Transfer
When the File Transfer button is clicked, the person clicking on the file will see a standard windows file select window.
After files are selected, provided the file size is not over the pre-set limit, the sender and the receiver of the file will see a prompt.
Sender View
Once the receiver accepts the file, the sender will see a progress bar through to completion for each file being transferred. Arrows next to each file indicate they are being uploaded.
- Initiate Chat - Presenters and viewers can speak via an instant messaging interface.
- Transfer File(s) - This allows the user to send files to anyone selected in the attendee list.
- Allow Keyboard Mouse - Give keyboard and mouse control of another terminal to the presenter.
- Change Presenter - The organizer will start the session as the presenter but may select any user in the list and set them as the new presenter.
- End Session - Only the organizer may end the session. Others may leave the meeting but only the organizer may end the session. If the organizer leaves the session without ending the session, the session will end
Receiver View
When the file is sent, the receiver will see the following:
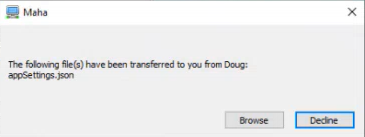
If the user accepts the files, the files will begin to transfer files to the users default download location configure within their saved screen sharing options (shown later in document). If the default location has been set, it should be asked for at this point.
Once the receiver accepts the file, they will see a progress bar through to completion for each file being transferred. Arrows next to each file indicate they are being downloaded.
Screen Sharing Options
The Options button at the bottom of the session console will display the following:
General Tab
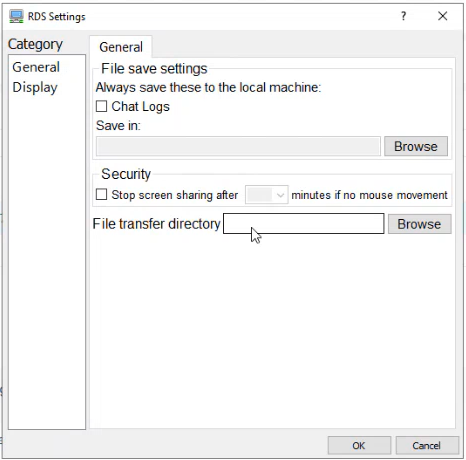
The first tab, General, allows you to set:
- Whether or not chat logs should be saved and where they should go
- If Screen sharing should stop after a certain duration of time (only available to presenters)
- The default folder for incoming file transfers
Display Tab
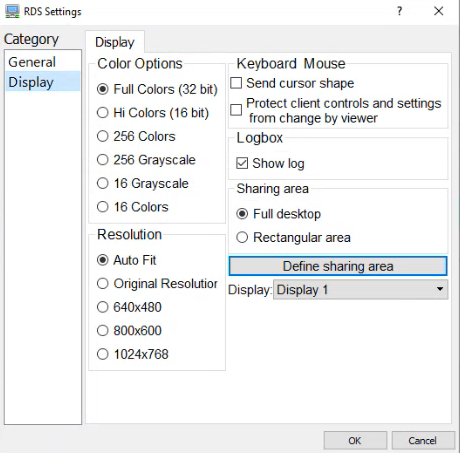
The second tab, Display, allows you to set:
- The colors quality of the display.
- The resolution of the display.
- The sharing area (full screen or enclosed area)
Ending/Exiting the session
Closing the Interface window will exit the user from the session and kill the screen sharing application on that user’s machine. If the organizer closes their window, all screen sharing will be stopped, all attendees will be removed from the session, and all attendees will receive a message informing them the session has ended.